
Connecting via plugin or custom API integration
For popular eCommerce platforms such as Shopify, WooCommerce, and others, the integration process is usually simpler. In many cases, you can install a dedicated theMarketer plugin directly from the marketplace or module section of your eCommerce platform.

Once installed, the plugin uses the API keys available in ‘Settings’ → ‘Technical Integration’, thus creating the connection between your website and theMarketer.
As mentioned before, the plugin also requires a valid Google Tag Manager ID, preferably installed directly in your website’s code, so that website events can be tracked correctly.
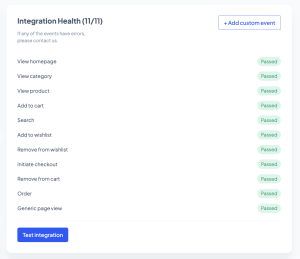
After installation, you can check whether theMarketer tracking is active from Settings → Technical Integration. You should inspect the website and search for mktr only if tracking does not work correctly after the plugin installation.
If your eCommerce website is custom-built, your developer will need to configure the integration manually using the API documentation and the API keys from your account: Tracking Key, REST Key, and Customer ID.
Installing the JavaScript tracking code and syncing subscribers
Before you can use theMarketer to its full potential, the platform needs to be connected to your website, eCommerce platform, or CMS. This connection allows theMarketer to understand what visitors are doing on your website, capture subscribers correctly, track purchases, and later power automations, personalized recommendations, segmentation, loyalty programs, and reports.
The integration is quite straightforward if you have a bit of technical knowledge or access to a developer. The exact technical instructions are available in theMarketer API documentation, but in this section, we will focus on what needs to be connected and why each step matters.
Regardless of your subscription plan, the first technical step is to insert the JavaScript Tracking Code on your website.
This code must be placed right before the closing <head> tag of your website. To use it, you will need the Tracking Key from your theMarketer account, which is automatically generated when your account is created. You can find it by going to ‘Settings’ → ‘Technical Integration’
This tracking code is loaded asynchronously, which means it does not slow down your website. It works independently from your application, so your pages can continue loading normally while theMarketer tracks the required activity in the background.
The next step is making sure subscribers are added to theMarketer properly.
By default, double opt-in is OFF for all theMarketer accounts. This means that when someone fills in a subscription form, registration form, or checkout form, they must explicitly agree to receive promotional emails.
If the user checks the option to receive promotional emails, your website needs to call the Add Subscriber API. This will add the contact to theMarketer. If double opt-in is enabled in the account settings, the platform will also trigger the double opt-in confirmation email.
If the user does not check this option, they can still be identified in theMarketer through the __sm_set_email event, but they will not be subscribed to the newsletter.
This distinction is important because identifying a user and subscribing a user are not the same thing. A user can exist in the platform as a contact without being eligible to receive promotional campaigns.
The same logic applies to unsubscribes. If a subscriber unsubscribes directly from your eCommerce platform, for example, from their customer profile, your website needs to call the Remove Subscriber API. This ensures that the email address is also unsubscribed in theMarketer, keeping consent status synchronized across platforms.